Zoom and other video conferencing software have necessarily become more prominent pedagogical tools on BC’s campus and elsewhere. While there are clear benefits to using Zoom, instructors and students have also noted that under some circumstances, Zoom can exacerbate already existing inequities in ways that may go unnoticed. Zoom’s technology can also make it easier for some students to access beneficial supports (e.g. live transcription).
This page covers some of the challenges that Zoom can pose for students and some strategies for minimizing those challenges. It also makes note of some Zoom features that can proactively contribute to a more inclusive learning environment.
If you would like to talk to a CTE staff member about best practices for teaching with Zoom, or about inclusive pedagogies more broadly, contact the CTE at centerforteaching@bc.edu.
Some students are not familiar with Zoom
Not all students will have used Zoom before, or may have only used it for personal meetings. While Boston College requires students to take certain steps to access Zoom meetings hosted by members of the community, some students may not be familiar or comfortable with those steps.
Options to consider: Provide clear instructions to students and make space for practice Zoom sessions
You can send students the “Zoom for Students” guide so that they can become familiar with the features of Zoom. The ITS Zoom website is also an important resource for students navigating the technology, and students can always contact the Help Desk for support.
In addition, allowing students to practice with Zoom at the beginning of the semester can reduce confusion later on, especially if the class needs to transition to a format that makes more intensive use of Zoom.
Some students are not able to connect to live Zoom sessions
Some students may not be able to access your live Zoom session due to internet connectivity issues. According to 2016 data from the United States Census Bureau, only 21 percent of lower-income households are highly connected, compared to 80 percent of higher-income households. Therefore, some students who will be participating remotely will not have reliable internet access.
Furthermore, some students may be in vastly different time zones. If the time difference is large for these students, they may not be able to attend your Zoom sessions synchronously.
Options to consider: Make recordings available and incorporate asynchronous learning opportunities
One step that instructors can take to ensure that all students are able to access the material from a live Zoom session is to make the session recording available to all students. You can find out how to record Zoom sessions in our “Recording in Zoom” guide.
Another way to ensure all students are supported in their learning is to include asynchronous methods for students to engage with the material and with other students, for example, an asynchronous discussion board on Canvas. If all interactive discussions and activities are held during synchronous Zoom sessions, some students will be excluded from this part of the learning process.
Zoom fatigue
Research shows that long Zoom meetings can cause fatigue. This may affect some students more than others.
Options to consider: Limit session length and schedule in breaks
In order to mitigate “Zoom fatigue,” try to aim for shorter sessions where possible. Synchronous Zoom sessions can be supplemented with asynchronous delivery of lecture material through tools such as Panopto, and assignments in which students can engage with the material either on their own or in groups.
For longer sessions, students may benefit from scheduled breaks. It is best to allow students to turn off their microphones and cameras during these breaks.
Inequity in access to learning spaces
There will likely be disparities between students in the type of spaces they have access to in order to engage in their learning. Some students will not have a private and quiet space, and may not feel comfortable showing their physical surroundings to their peers and instructor.
Options to consider: Allow students to join without video, to mute microphones, and normalize use of virtual backgrounds
Instructors can take steps to make the virtual classroom a space where all students feel welcome. Allow students to turn off their video or mute their microphones when they are not presenting to the class so that they can keep private some aspects of their physical space.
Virtual backgrounds are a great way to further enable students to omit parts of their physical space from the Zoom session. Normalize the use of appropriate virtual backgrounds in Zoom by making explicit your expectations around the use of this feature. Boston College Zoom backgrounds are available for free.
Accessibility
Students with disabilities may require accommodations in order to fully participate in Zoom sessions. If that is the case, the Disability Services Office and/or the Connors Family Learning Center will work with you to meet the needs of those students. In line with Universal Design for Learning, you may also want to make use of some Zoom features in order to make the platform more accessible to all students from the start.
Options to consider: Provide closed captioning or ASL interpretation, provide resources on Zoom shortcuts and controls, provide content in multiple modalities, and provide accessible versions of materials.
An important step to meeting the accessibility needs of your students is to let them know that they can request accommodations. Students will work with the Disability Services Office (for students with medical, physical, psychological, or temporary disabilities) or the Connors Family Learning Center (for students with learning disabilities and/or ADHD) to request those accommodations. However, there are some features within Zoom that can make the classroom more accessible to more of your students.
Automatic Live Transcription
Zoom recently launched an automatic live transcription service that will live caption speech in Zoom. Automatic live transcription does not create an ADA-compliant transcript of the meeting, meaning students with documented accommodations may still require separate supports arranged through Disability Services. However, this feature can provide a more accessible environment for many students, including English language learners, students who are undiagnosed or don’t have access to approved accommodations for any reason, and students who may need to lower or turn off their volume if they have to join class from a less comfortable environment.
There are a few other limitations to this feature:
- Privacy: While only a host or co-host can turn on automatic live transcription, anyone on the call — hosts and participants — can view and save a transcript. Because the host cannot turn-off the ability for participants to save transcripts, it is possible that some users could have a record of their conversations saved without their knowledge.
- Uneven transcription quality: You may find that some voices are more reliably transcribed than others, and some voices may be more reliably recognized as a particular speaker than others. Auto-transcription is especially known to be less reliable when representing non-native English speakers, and those who speak with some regional dialects or accents.
- Breakout rooms: Live transcription is not currently available in breakout rooms.
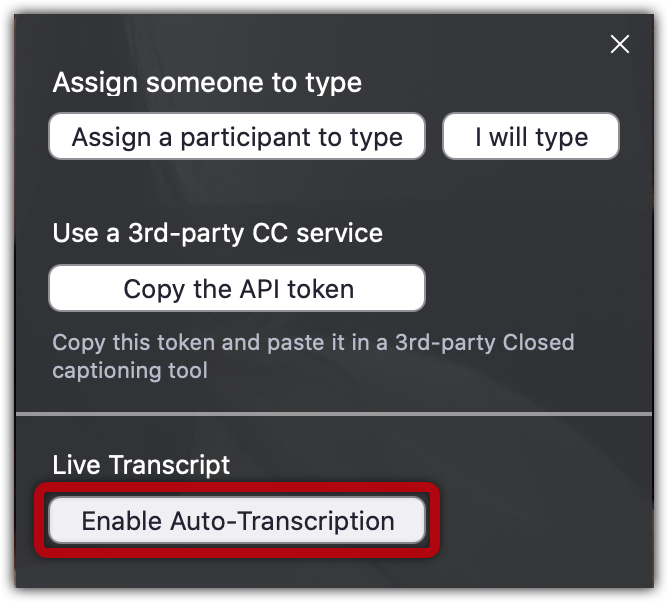
If you want to enable automatic live captioning, start by selecting “Live Transcript” in the Zoom menu bar.

From the captioning menu, select “Enable Auto-Transcription.”

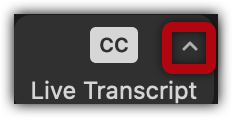
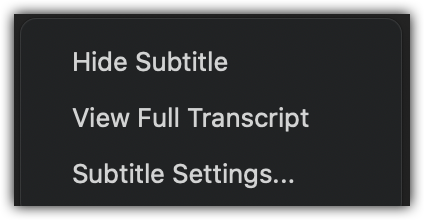
Once Auto-Transcription is enabled, you can select the small arrow next to “Live Transcript” in the menu bar to see other options.

“Hide Subtitle” allows you to remove the auto-captioning from your screen. “View Full Transcript” opens a window panel that displays the full transcript and allows you to save the transcript. “Subtitle settings” allows you to change the appearance of the subtitles on your screen.

Other Accessibility Features
Students using assistive technology may benefit from knowing what the Zoom keyboard shortcuts are. The keyboard shortcuts are provided on the Hot Keys and Keyboard Shortcuts page. It may also be helpful for students using assistive technology to be able to have the Zoom menu bar always showing (instead of having to hover their mouse over the bottom of the screen to make it appear). Instructions for changing this setting can be found on Zoom’s Changing your meeting settings page.
You may need to provide the content you are sharing through Zoom in multiple modalities to accommodate students with accessibility needs. For example, a graphic presented on the screen may need to be described verbally. You may also want to provide accessible materials ahead of time, such as a copy of the slides that are screen reader compatible. More information about how to make Zoom accessible for all students can be found on the Accessibility Best Practices for Zoom Meetings page from Yale University and the Zoom and Accessibility page provided by the University of California.
You can get in touch with us at centerforteaching@bc.edu if you have any questions about how to make your Zoom usage more accessible.
Pronoun Display
As part of creating a more inclusive classroom environment, you may want to display your pronouns in Zoom. Zoom’s Pronoun Feature allows you to add pronouns to your profile and provides more granular control by allowing you to share and unshare pronouns in a meeting. For a step-by-step guide, see Zoom’s documentation on adding and sharing pronouns.