YouTube provides an easy-to-use interface for adding captions to a video. This guide provides step-by-step instructions for adding captions to a video in YouTube as well as instructions for how to download the caption file (.srt) and add it to a video in Panopto.
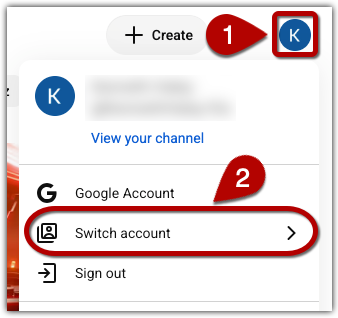
Open YouTube and click on “account’ icon, the letter in the circle in the upper right hand corner [1]. In the drop down menu that appears, click “Switch Account” [2].
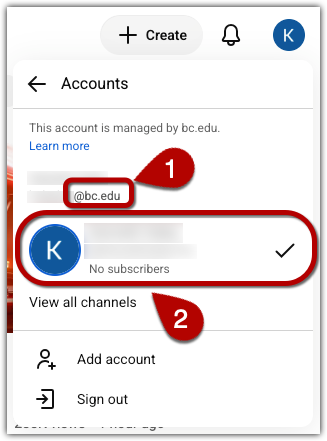
A list of the emails you have used to sign into Youtube will appear, and beneath each email will be a list of the associated Youtube accounts you have access to, this may include your own personal email and your BC email. Ensure you are signed into your BC email and select the account you wish to manage the videos with.
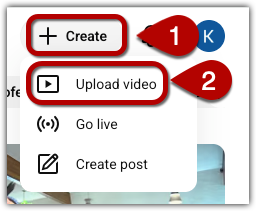
On the top right hand corner of the screen, click the “+Create” [1]. From the drop down menu, click “Upload video” [2].
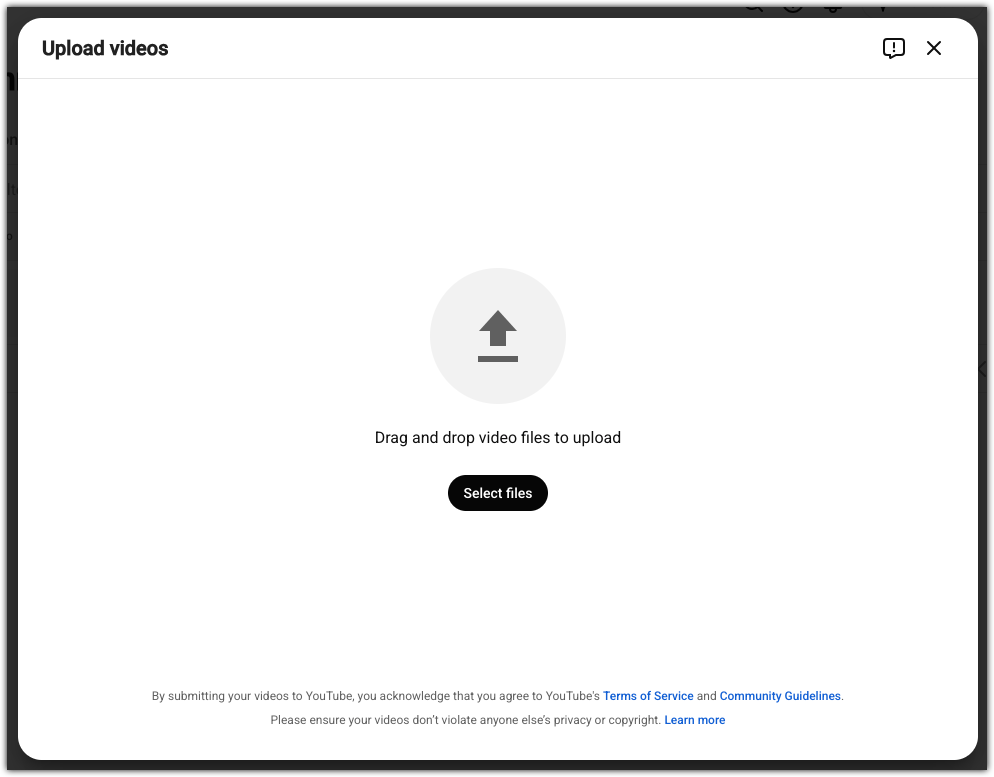
Drag and drop the video you would like to caption or select it using the “select files” button.
Once YouTube has completed processing the video, you will be able to set and edit a number of fields, including the title, the description, the video’s thumbnail and more.
Youtube also requires you to set the “Audience” option [1]. The basic version allows you to choose from “Yes, it’s made for kids” or “No, it’s not made for kids.” Once you’ve set this option, click “Show more” [2].
Clicking on “Show More” opens up many other options, including Tags, comment options and more. In order to access the subtitle options scroll down through these options until you locate the ”Language and captions certification” settings. Set the “Video language” [1] to match the video’s audio. Next, set the “Caption certification” setting [2]. For more information on this setting, hover over the “Learn More” icon (a “?”) and read the panel that appears. Once you have set the video language and caption certification, click “Next”.
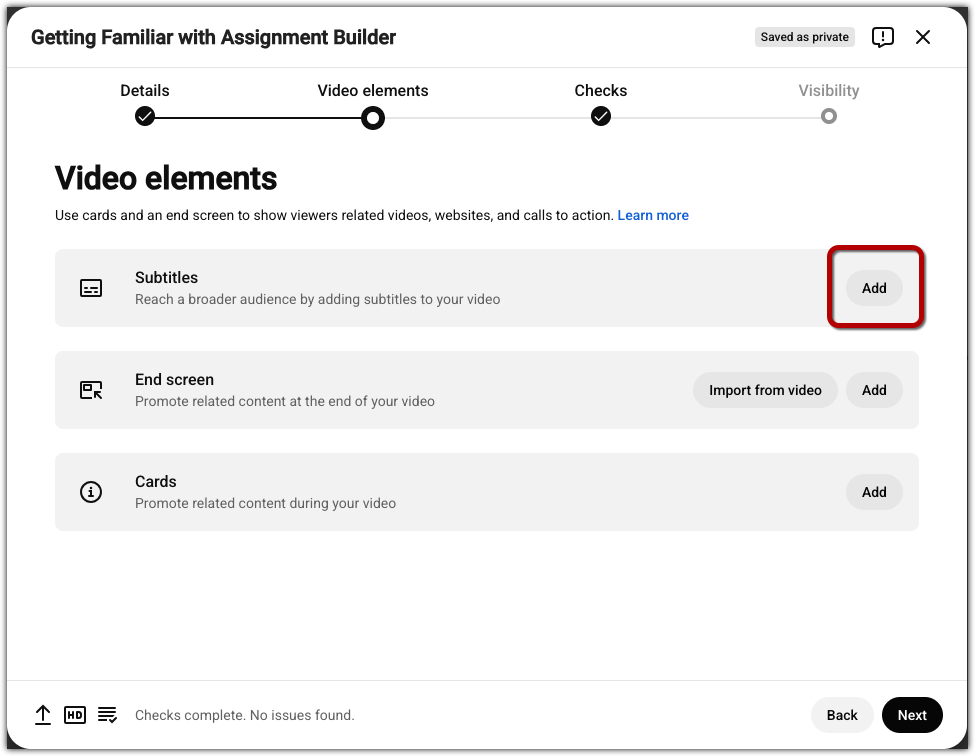
From the Video elements page select click on the “Add” button to the right of “Subtitles”.
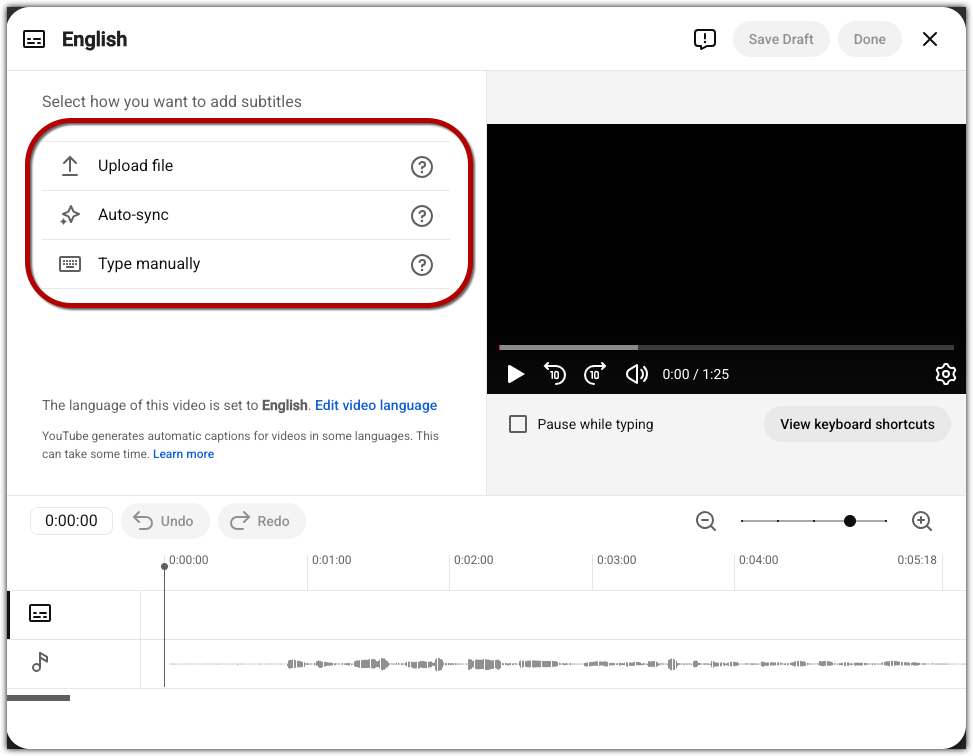
You will now be able to choose from three methods of adding your subtitles. Hover over the “Learn More” question mark icons to the right of each option for further information, but briefly: “Upload file” allows you to upload a file containing the captions and time stamps, “Auto-synch” allows you to type or upload a full transcript and Youtube will attempt to set the subtitle timings automatically, “Type manually” allows you to manually enter the subtitles as you watch the video.
Notes about Manual Subtitles
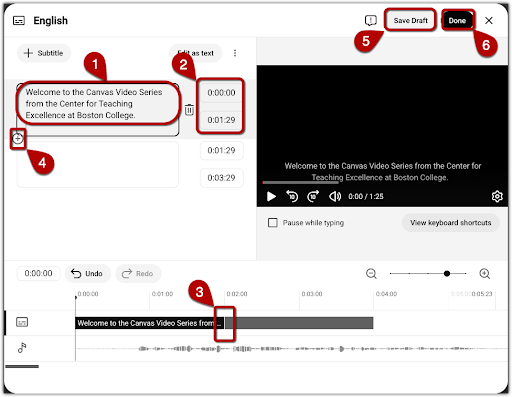
If you select the “Type manually” option you will be able to transcribe the audio and set the timing for each individual line. To do so, enter a line of text into the box on the left [1], then you can change the timing by entering in the two fields to the right of the text box [2]. The first time box is when the line appears while the second is one it vanishes, the entry box uses a minutes/seconds/frames format. You can also set the timing by dragging ends of the caption in the visual timeline [3]. When you’re done with one line and want to add another, click the “Add caption line” plus-symbol icon [4] in the lower left hand corner of the text box, this will create a second group of fields and options so you may continue adding subtitles. You can save your work by clicking on the “Save Draft” button [5], to leave this page click on “Done” [4].
To resume your work
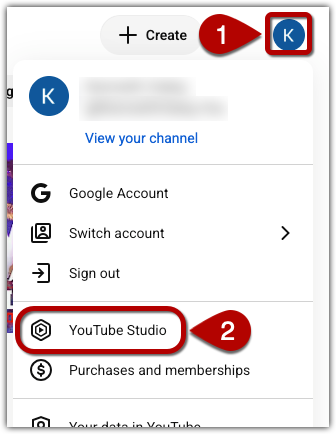
Log into Youtube, click on the “account” button, the circle in the upper right hand corner [1] and then click on “Youtube studio” [2].
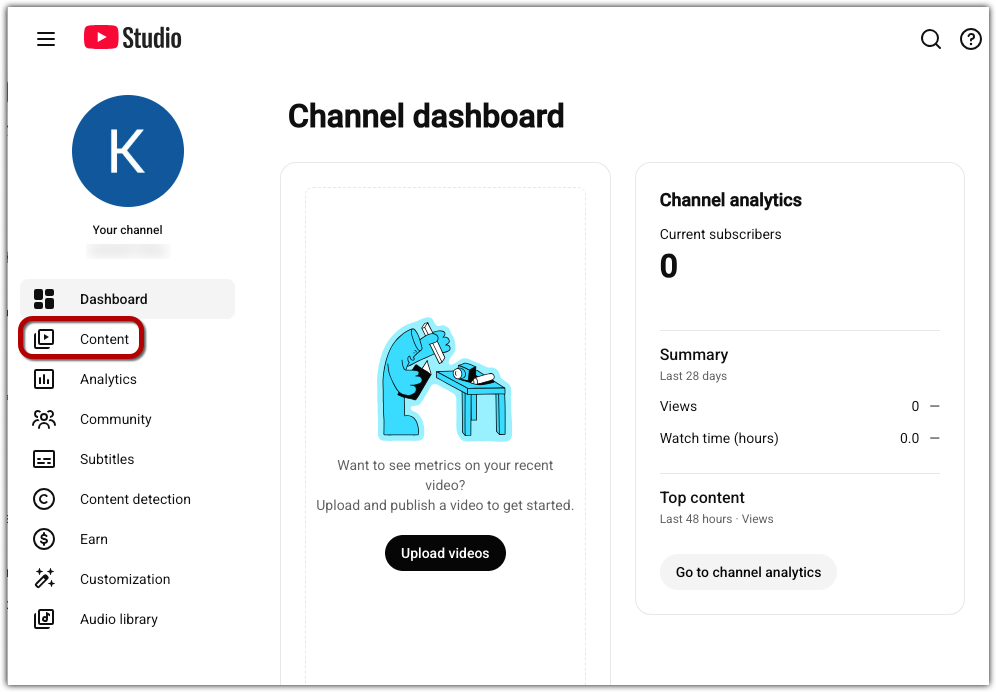
Once on the Youtube Studio page, locate and click on “Content” the left hand menu.
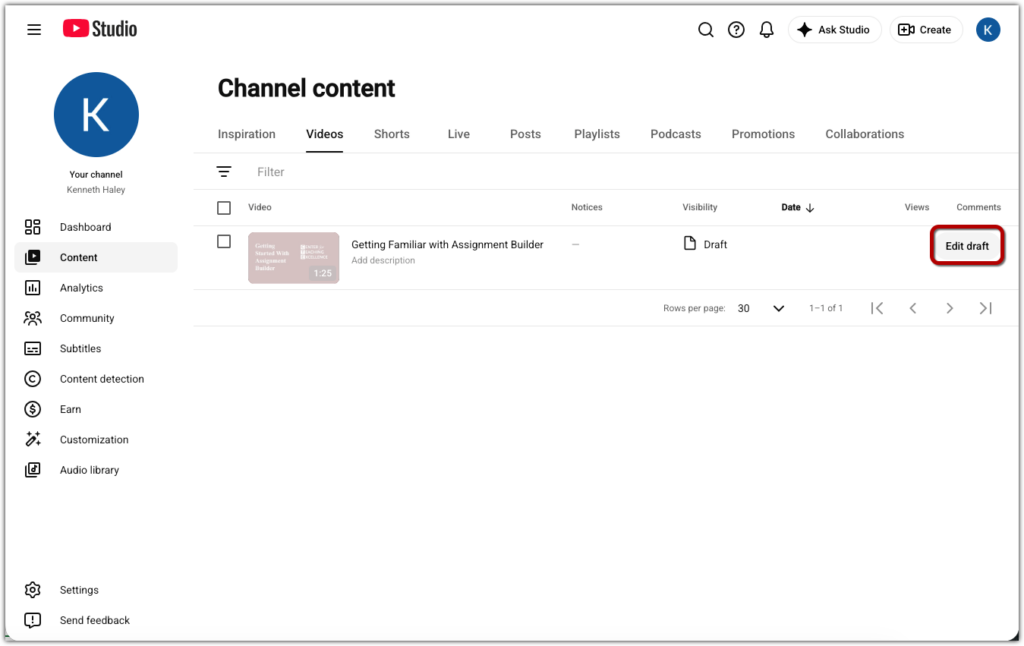
You will now see a list of the videos on your Youtube channel. Locate the video you wish to edit and click the “Edit draft” button to its right.
This will take you back to the “Details” panel. From here you make any changes you wish to the options as detailed above. Once you’re finished, click “Next” to proceed to the “Video Elements” panel. Once there, click the “Edit” button next to the “Subtitles” option to return to your work.
When you’re finished adding the subtitles, click “Done” to return to the “Video Elements” panel and click “Next” to proceed to the “Checks” panel. From here you can review any potential copyright issues the video may have.
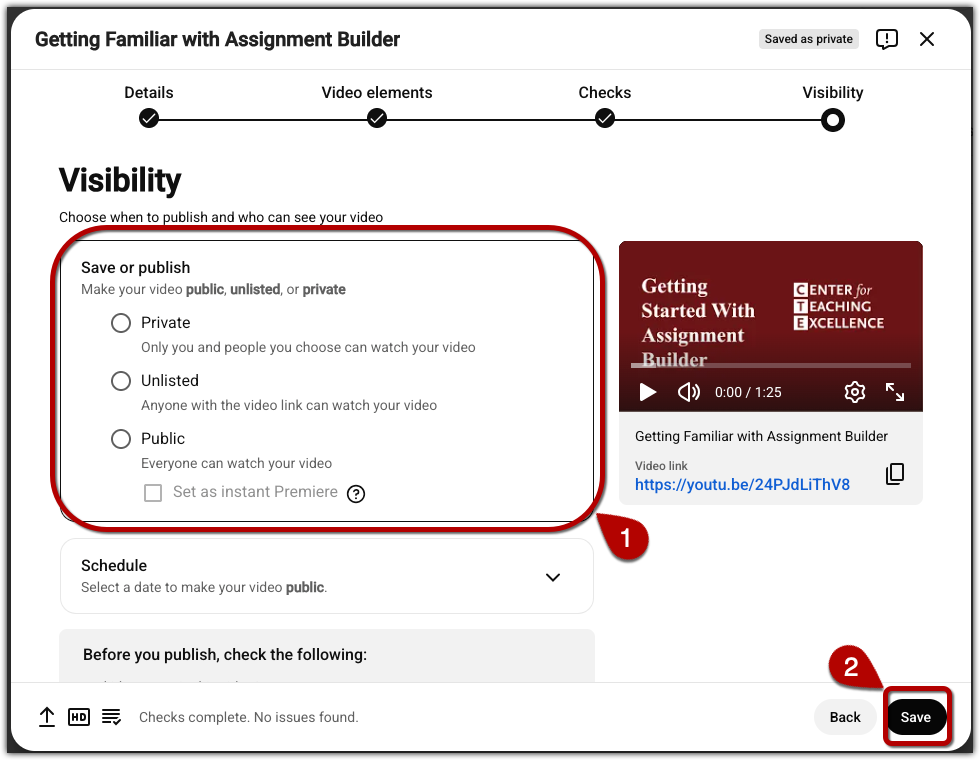
Click “Next” again to proceed to the “Visibility” page. From here you can change the settings of your video’s visibility [1]. By default, as you are editing the video, it is marked as “Private” which means that it’s visible to only you and those you invite to view it. From this menu you may publish the finalized version of video and can alter the setting level to “Unlisted,” which means it will be published by won’t turn up searches, and it will be visible to anyone with a link, or “Public,” which means anyone will be able to see it and it will turn up in Youtube searches. When you’ve chosen the Visibility setting, click Save to publish the video.
Please note, you do not need to publish the video to download the subtitles you have added to the video.
Download .SRT files from YouTube
Log into Youtube, click on the “account” button, the circle in the upper right hand corner [1], and then click on “Youtube studio” [2].
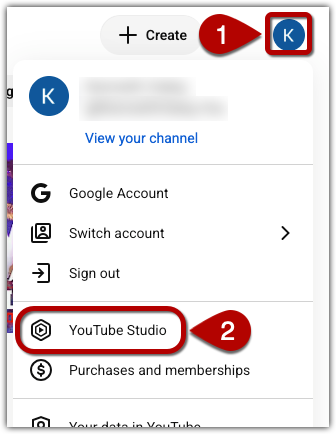
Once on the Youtube Studio page, locate and click on “Content” the left side menu. You will now see a list of the videos on your Youtube channel. Locate the video you wish to edit and click the “Edit draft” button to its right.
This will take you back to the “Details” panel. From here you make any changes you wish to the options as detailed above. Once you’re finished, click “Next” to proceed to the “Video Elements” panel. Once there, click the “Edit” button next to the “Subtitles” option.
To download a file of the captions you’ve created, click the “options” icon, the stack of three dots to the right of the “Edit as text” button.
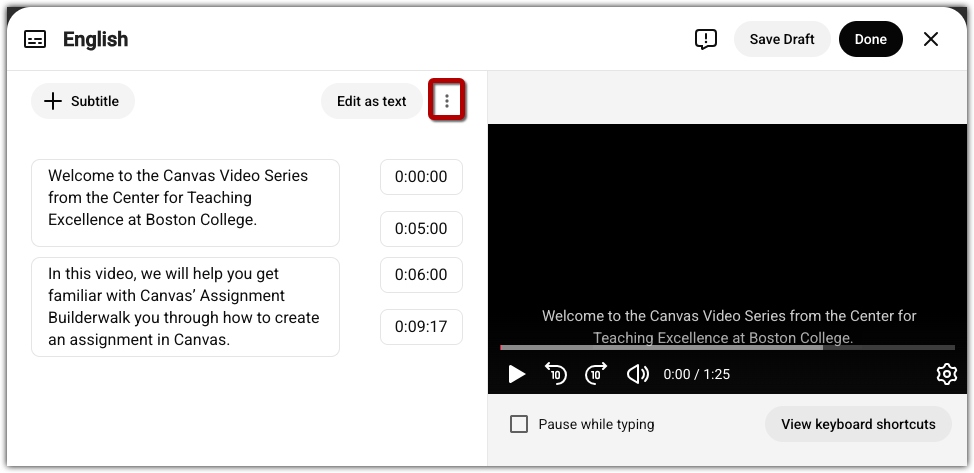
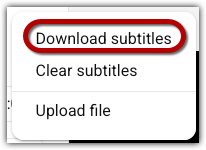
From the drop down menu, click “Download subtitles.” This will allow you to download the subtitles as a separate document you may upload elsewhere.
Please note, the file format is determined by the information included when creating the subtitles. If you break the subtitles down with individual time stamps, they will be downloaded as “captions .srt”. If you leave the subtitles as a block of text with no time stamps, they will download as “transcript.txt”.