Pages provide instructors (and students, if desired) the opportunity to author course content directly on the web. The advantage of using pages, rather than uploading computer files, is that pages can be interactive, can include rich media like video and audio, and can link to other pages, assignments, discussions, and other course activities in Canvas. Pages shift the dominant paradigm from designing content offline and uploading it to Canvas to instead developing content directly in Canvas. Pages also features Microsoft’s Immersive Reader, making content created in Pages more accessible.
Use Cases
Example 1: Weekly Page
Each week, an instructor in nursing wants to provide students with a few web links and videos that pertain to the week’s topics and would like them to review these links before class. Because the content that the instructor would like the students to review involves rich multimedia, including videos, interactive webpages, and audio files, creating a Canvas page would likely meet the instructor’s needs. The instructor then places the page in course modules and instructs students to review the modules each week to find the page that has materials they will need to review before the beginning of the course.
Example 2: Content Wiki
An instructor in a foreign language literature course would like each student to develop a webpage that includes rich multimedia and links to external sources for authors, poets, and musicians writing and composing at the time of the Spanish Civil War. The instructor creates a module in which all projects will be placed and then creates a page for each student’s project, setting the editing option to “Teachers and students”. Students are then required to not only develop their own page but to read through other page content and complete a writing assignment on the material presented on other students’ pages.
Example 3: Link-out Syllabus Pages
An instructor in biology using the Syllabus feature in Canvas wants to include the full-text of the course syllabus online but does not want to have too much information on one page. The instructor uses Syllabus to include important, everyday information including contact information, course description and objectives, as well as a brief class outline. Throughout the Canvas page, the instructor links out to detailed information like grading policies, resources for writing scientific papers, and week-to-week descriptions of course activities, which are each created in separate Canvas pages and linked using the rich content editor.
Example 4: Resource Pages
An theology instructor is working with a subject-specific librarian to develop a rich research resource for students who are working on their final papers for the course. The instructor creates links to different research databases, including the libguide created by the librarian. On the final assignment description, the instructor links to the resource page so that students have some guided direction as they begin their research papers.
Example 5: Selectively Release Pages
An instructor is teaching multiple sections of the same course, but wishes to tweak the readings and assignments slightly for each section. To aid in this, they create different pages assigned to different sections, ensuring that each section has a different experience, despite using the same Canvas site. This can be done by selectively releasing pages to different groups of students.
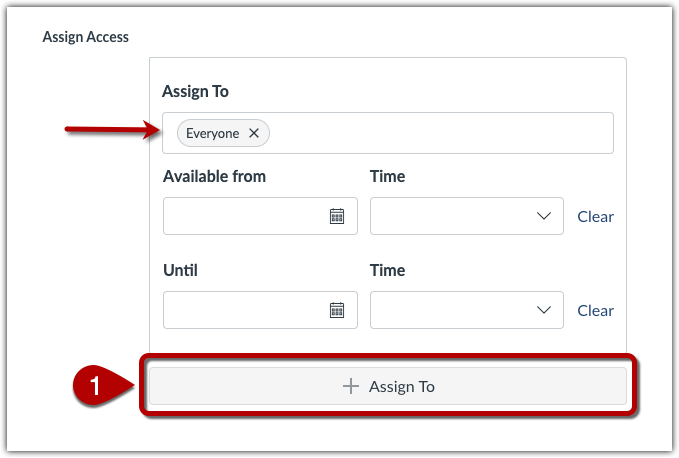
To adjust the “Assign to” field navigate to “Pages” in your course Navigation Bar and select the Page you want to adjust. This brings you to the Page Details page. In Page Details, scroll to the “Assign” field at the bottom of the page. By default, the “Assign to” field is set to everyone. To change this, click on the “+Assign To” button [1].

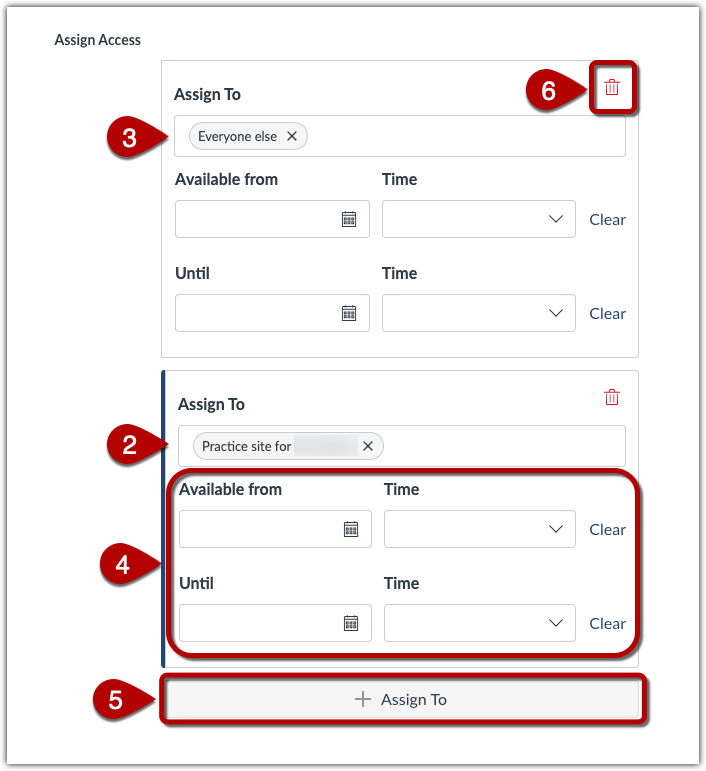
You can then “Assign to” [2] a section, group or individual student from a dropdown list to customize their availability window. Note that the first “Assign to” box now reads “Everyone Else” [3] after making your selection from the list. You can use the “Available from” and “Until” [4] options to limit the period within which that subgroup of students can access the Page. You can assign the Page to a third group by clicking “+ Assign To” once more and repeating the process [5].

To make sure only the assigned groups or people see the pages, either use the top section (“everyone else”) to make a selection, or delete it by selecting the trash can icon [6].
Immersive Reader
Immersive Reader, a learning tool from Microsoft, is now available for use in Canvas Pages. Immersive Reader allows individual students and instructors to customize their display, access resources like dictionaries and translations, and listen to text-based content, making it easier for all students to access course content, maintain focus, and work through unfamiliar material.
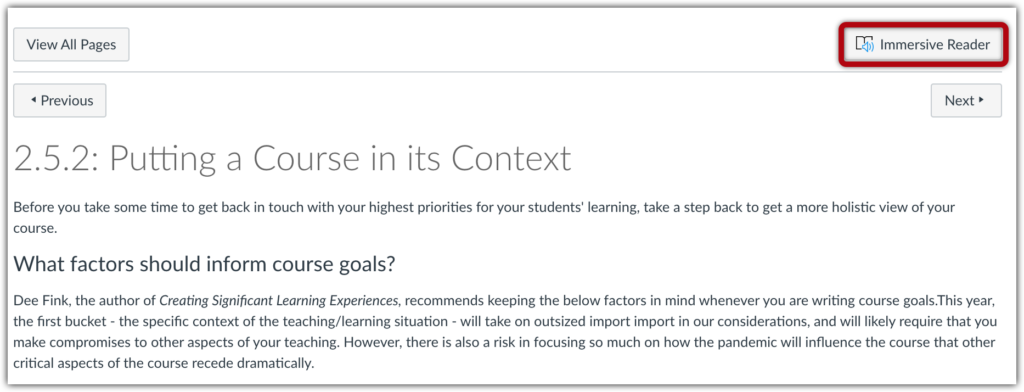
To access the tool, select the “Immersive Reader” button in the upper right hand corner of a Canvas Page.

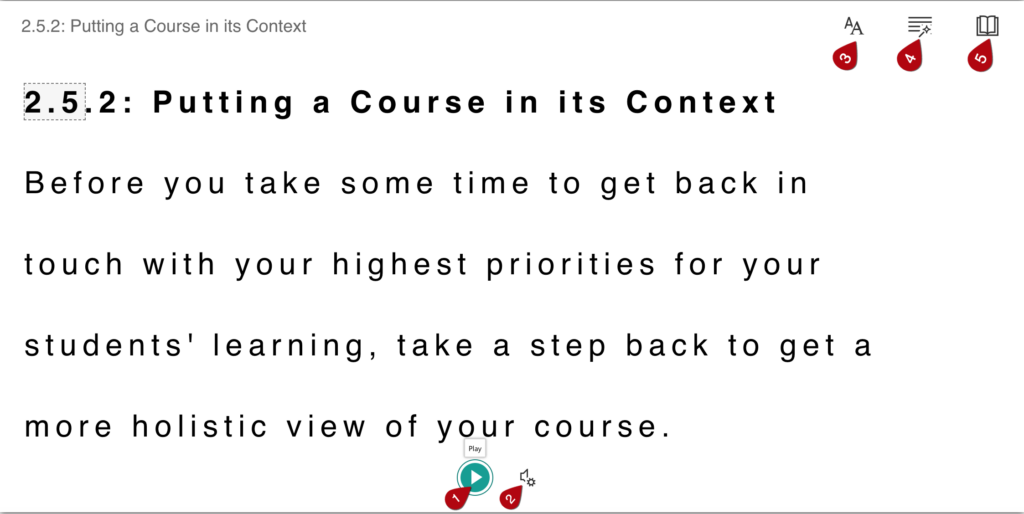
That will open a new window with large point text and wide text spacing. In this window, you can have the content read aloud [1], adjust voice settings [2], edit text preferences [3], grammar options [4], and reading preferences [5].

There are a few limitations to the immersive reader tool:
- Because it is only available in Pages, it cannot be accessed in Assignments, Discussions, Quizzes, or Syllabus.
- In order for the Immersive Reader to be most effective, you will need to take other accessibility measures, like tagging images with alternative text, which you can do when uploading images to Canvas.
- The Immersive Reader only interacts with text, and cannot play videos within its display.
- The immersive reader is not entirely compatible with some of the Design Tools features that are used in fully online courses at Boston College, and may not be able to display all components of a page in that case.
For further information, see these guide from Instructure:
- What are Pages for instructors?
- How do I create a new Page?
- How do I change a Page name?
- How do I delete Pages?
- How do I link to other Canvas Pages?
- Where is the Front Page and how do I edit it?
Additional information on pages can be found in the Pages Chapter on the Instructure website.