Deciding Between Google Grader and Canvas SpeedGrader
If you create an assignment with the Google Assignments integration, you can grade that assignment with the Google Grader or Canvas SpeedGrader. The below feature comparison is intended to help you decide which grading interface will work best for your needs.
| Feature | Google Grader | SpeedGrader |
|---|---|---|
| Comments | Yes | Yes |
| “Overall” Comments | Yes | Yes |
| Commenting Bank | Yes | Yes |
| Highlighting | Yes | Yes |
| Edit Suggestions | Yes | No |
| Originality/Plagiarism Check | Yes | No |
| Version History | Yes | Yes |
| Attachments/Audio/Visual | No | Yes |
Additional guidance about a few features:
- Edit Suggestions: Allows you to specifically add lines, words, or punctuation suggestions directly on the submitted assignment. The suggested edits will be marked by under and overlining. Students will also have the option to accept or reject edit suggestions on their end.
- Originality/Plagiarism Check: The Originality checker is a tool that allows an instructor or student to check their paper against a general search of the internet and Google Books.
- Version History: Both Google Grader and SpeedGrader offer their own variation on Version History. For Google Grader, a student may resubmit a document after its initial upload. When you open the document as an instructor, the changes between the various submissions are highlighted. In SpeedGrader, students can submit multiple versions of the document. As an instructor, you can select which submission you would like to review, but changes between the submissions are not highlighted. In an Assignment completed through the Google integration, instructors can also see a version history of the doc tracing the development of the work before it was submitted, assuming it wasn’t drafted elsewhere and pasted in.
- Attachments/Audio/Video: You can attach a file to the graded assignment, or record audio or video feedback in SpeedGrader itself as feedback for the students.
Navigating Google Grader
Google Grader can be split into three main sections, each of which will be examined in more detail below. Briefly, the top panel consists of navigation and submissions tools. The largest portion is made up of the Document Viewer, that contains the submission being graded and allows for feedback, editing, and more. The right side of the page contains the Feedback and File Information section.
Class Navigation and Return
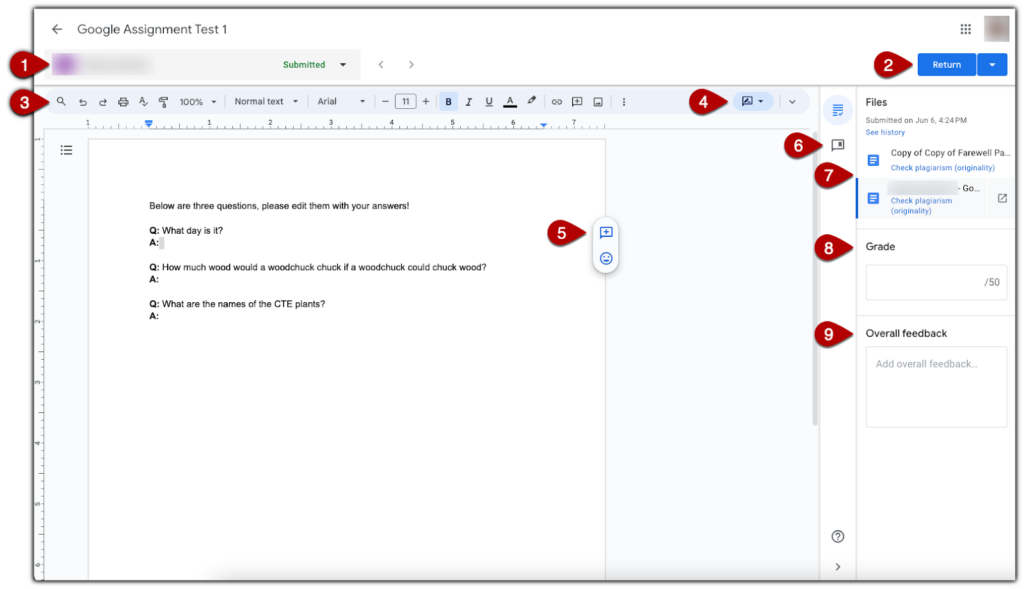
Student Information [1] – Provides you with the name of the student whose submission you are viewing and the status of their submission. You may navigate from student to student by clicking on the arrow buttons. Additionally, clicking on the student’s name opens a drop down menu with the names of all the students who have submitted a file for the assignment. The drop down menu also allows you different sorting options for the list.
Return [2] – When you are finished commenting and grading a document, click on “Return” to submit the grade and comments to the student. Note, you can comment on and grade multiple student submissions and the comments and grades will be saved as you work on them. To return submissions from multiple students at once, click on the arrow next to the return button and select “Return Multiple Submissions”. You will be prompted to choose from a selection of the submissions available to you. Check off the names of the students whose submissions you wish to return, and click “Return”.
Document Viewer
Toolbar [3] – Contains the standard options for a Google document. It allows you to change font, font size, color, use a highlighter, add images, links, etc.
Editing/Suggesting/Viewing [4] – By default this is set to Suggesting Mode, but by clicking the icon in the upper right hand corner of the document, you may switch to Editing, Suggesting, or Viewing mode.
Comments [5] – In order to leave a comment, highlight a portion of the submission and click on the comment icon that appears on the right edge of the document. You may also leave emoji responses if you choose.
Comment Bank [6] – Clicking on this icon opens up a comment bank. This allows you to save and create standardized comments for use across multiple students and assignments by copying and pasting. To add a comment to the Comment Bank, click on “Add to bank,” this will open an “Add Comment” panel where you may type one or more comments. When you’re finished adding comments, click “Add”. The comments have now been added to your comment bank. To access a new comment, hover over it and click on the blue copy and paste icon that appears in the lower right hand corner of the comment. Then create a new comment on the assignment submission, and paste the text into the comment box.
File Information + Feedback
File Information [7] – The file information section lists the number of files a student has submitted for a given assignment, and the date of the latest submission. Clicking on “See history” opens a panel listing a history of activity for the assignment including submissions, unsubmissions, changes in grading and when it was returned. This is also where you can run the Originality Checker, if you opted to turn it on during the assignment creation process, by clicking on “Check Plagiarism/Originality” beneath the file name.
Grade [8] – Where you submit your grade for the assignment. It adheres to the point value you gave the assignment when you initially created it.
Overall Feedback [9] – A space to issue feedback for the assignment overall rather than on the document like the previously discussed comment option allows.